Thursday, November 29, 2012

Santa Countdown

Look how fun this Santa Countdown turned out! My son's 1st grade class is super excited to start using it.
It only has 14 links because that is how many school days they have come Monday! How can that be!!!!!!
How did I make it you say? Well, with my Kiwi Lane templates of course! :)
Here is my general idea that I started with. -note I didn't end up using the star
Supplies:
Kiwi Lane Templates
Rings -Background and cap "ball"
Celebrate -Mustache
Wacky -cap
Tiny Wacky -beard
Pattern and solid paper, ink, daubers, scissors, pencil, cotton balls, adhesive, foam tape
I made this project with I Believe from My Minds Eye paper and the solid is Stampin Up.
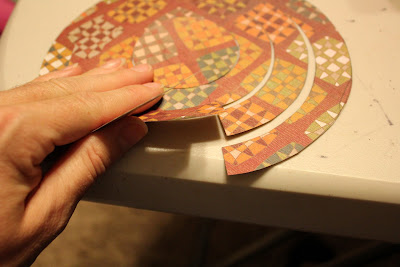
First, trace your rings. A quick trick to cutting them easily is,once traced, cut a slit from outer to center ring then cut along the lines. Don't worry, you will be able to hide the slit in your layering. Also, don't cut the center out of the smallest ring for this project.  -note if your paper has a special pattern be careful where you cut your slit to make sure it will be hidden.
To make the cap I used the large "cloud" from Wacky. I could tell from my template design that I would need to make some adjustments, that is what you see here and in the next photo. -Note I started making it in white but changed my mind to the print you see on the final product.
I purposely made the cap long because I knew that I wanted to fold it to give it a little extra dimension.
You will want to play with your folds and then I used the largest ring, that the cap would attach to, as a template to trim it to fit.-Here is a photo with the the print! :) The "ball" at the end of the cap is the smallest ring with out the center cut from it. - I think the spoon was from a scoop of Nutella to help me concentratet! LOL
Use the "paisley" from Celebrate to make the mustache. I first cut it with print paper and then changed my mind to white. I know, one of the points of the templates is to reduce paper use, but I was a little (a lot) distracted during this project. LOL -note when tracing the "paisley" make sure that one is right side up and the other right side down or you will have a problem, yep still distracted!

In this picture you can also see how I did the beard. First lay your ring on the paper about where you want the final placement. Then use the "cloud" from Tiny Wacky to trace it out.

Here I'm showing how I used the 3rd smaller ring for the top of the beard placement. I drew a line from the ring placement, cut a slit and tucked the ring into the beard. The idea being to make it sturdier but leave some red to be his "mouth". I don't have a photo but the eyes are cute from the circle and oval from Tiny Shapes.
With all the piece cut it is time to put it together! But first ink and distress to your liking.  I used foam tape to apply the mustache for a little more dimension. I used all 3 rings as you can see in this photo, although the stripe (2nd ring) does not really show in the final shot.
As you are layering it together keep in mind that the 3rd smaller ring is both the "mouth" and "nose" so play with it until you like it. I chose to add some cotton balls for fun, but that is totally up to you.
Here is how I attached the chain. And you are DONE!

Primative Nativity Countdown

When the weather clears and I have good light I will try to get a better photo. :)

After doing the fun Thanksgiving Countdown I just HAD to make a Christmas one! In our home we try to keep the Christ in Christmas so I knew I wanted it to be a Nativity theme. It was really fun to pull out my Kiwi Lane templates and see what I could come up with. It you haven't used the templates before, one of the really awesome things about them is the ability to layout what you are working on and play with it before you ever cut any paper.
After playing around a bit here is my rough design.
Supplies:
Kiwi Templates:
Rings -the background, Mary's head cover, Joseph's face
Tiny Shapes -the manger
Celebrate -body of Mary and Joseph and sheep, baby Jesus
Adventure -Star
Coordinating double sided paper
Ink, Duaber, Adhesive, Desired Emblishements

 Now I am ready to gather my papers and get to work. Just like the Turkey, I am just using scraps from an old paper packet. This paper is from an old Stampin'Up Packet.
First, trace your rings. A quick trick to cutting them easily is,once traced, cut a slit from outer to center ring then cut along the lines. Don't worry, you will be able to hide the slit in your layering. -note if your paper has a special pattern be careful where you cut your slit to make sure it will be hidden.
I forgot to take pictures, but you will also need to trace your Mary, Joseph. and Manger.
For the sheep I thought the "cloud" was too big so I just scaled it down while tracing. First I traced the part I thought would make a cute head and body, then I moved the template over and traced the back end. :)
 
I forgot to take a picture while I was doing it, so here is an after shot to give you an idea of how much I adjusted it.
I was really excited when I realized that if I flipped the "cloud" over I could make my Baby Jesus. Make sure when you do it that you make it a little bigger than I did here. -When I went to put it together I had not really given myself enough room for gluing it on.
As I indicated further up, I forgot to take pictures as I made Mary and Joseph. So here is a bit of a closeup of what I did. With Mary I just played with the smallest ring until it looked good and then trimmed and inked it. For Joseph I took the small circle cut from the smallest ring and when I liked the placement I drew a faint line where I wanted it and cut a slit to slide the circle into.
Ink and distress to your liking. Tuck the pieces as shown in the photo. Glue and add embellishments. I did not add more than the jute bow because I thought it fit the "primitive" feel. As it turned out the star is a sticker from the paper pack so I used it instead of cutting one, as is the 25 December square. Attach paper rings and Enjoy!

Saturday, November 24, 2012

Turkey Pillows

I learned to love these from my Brother & Sis-In-Law, Doug and Stephanie.  (although they call them Turkey Roll Ups) They make them every year after Thanksgiving and we crave them all year! 
These are a great way to use up left overs from the big dinner. You could fill them with anything; turkey, stuffing, cranberry sauce you name it but I like a cream cheese filling.

Recipe:
Preheat over to 350*

3 rolls of refrigerator crescents

Filling
1 pkg. cream cheese
1-2 cups chopped cooked turkey or chicken
2 stalks chopped celery
2 chopped green onions

1 stick melted butter
Italian Herb Bread Crumbs

Mix together filling ingredients. (I like to saute the onions and celery just enough to soft them a little but you don't have to) Open your crescents and unroll. Put a spoon full of the filling on each triangle as shown.
 To make the "pillow" fold the point over to the center of the bottom end as shown.
 Now fold one side up and press to seal.
 Now the fold the other side up and seal.
 Now tuck up the remaining edge to look nice and seal.
You now have a pretty rectangular "pillow". Continue until all of your pillows are made.
Now roll each pillow in butter and bread crumbs. Place on a greased cookie sheet and bake for about 20 mins or until golden brown. We like to eat ours smothered in left over turkey gravy! mmm
-These cool trays are from Pampered Chef if you were wondering. They come as a set of 3 ;)

8 Hour Salad

I found this recipe in an old Relief Society Cookbook my Mother in Law gave me years ago. It is super yummy and we use it for all kinds of special events. This picture is from my son's graduation party.
I doubled the recipe in this picture.

Eight Hour Salad
by Alice Knight

Recipe:
1 Head Iceburg Lettuce -broken in bite size peices
1/2 cup chopped celery -about 2 stalks
1/2 cup chopped green or red peppers
1/2 cup red onion
2 cups frozen peas
8 slices cooked, crumbled bacon
2 cups mayo
about a cup of shredded cheddar cheese

Layer half of the lettuce in a medium size bowl. (I like glass so you can see the layers) top with half of the celery, peppers, onion, frozen peas, and bacon. Spread half of mayo to the very outer edge and sprinkle with half of  the cheese. Do it all again and cover tightly in the fridge over night. The point is to allow all of those savory flavors to blend together and make a yummy "dressing". -note, if it is a really strong onion, go easy! lol We learned this the hard way this year at Thanksgiving. :)


Sue's Cranberry Salad

My Mother in Law, Sue has this AMAZING Thanksgiving Cranberry Fruit Salad. It has also become a HUGE hit on my side of the family as well.
I always get asked for the recipe, so here it is! The cranberries need to "marinate" in sugar overnight so be sure to allow time before the big day. This fruit salad is a staple at Christmas, Easter and of course THANKSGIVING!

Recipe
1 pkg fresh cranberries (chopped or grated)
1 1/2 cups white sugar (I usually use less)

Mix sugar into cranberries and let set over night.

1 can crushed pineapple -drained
1 can mandarin oranges -drained
1 cup Tokay grapes -seeded, sliced in half or quarters (These are sometimes hard to find so I have used what ever I can find.) 
1 chopped apple
1 small tub of whipped topping

Stir fruit into cranberry mixture and let set. Just before serving fold in whipped topping.

Wednesday, November 14, 2012

Chicken Cabbage Salad

I LOVE Chicken Cabbage Salad from the Better Homes and Gardens Cookbook. 
I have looked all over the internet and haven't been able to find the same recipe as the book, so here it is. A place on the internet for the true BHG recipe.

Chicken Cabbage Salad
1 3 oz package ramen noodle
1/4 c.  slivered or sliced almonds
2 TBLS sesame seeds
3 c. shredded Napa or Green Cabbage.  -About half of a 1 pound head
2 c. chopped cooked chicken or turkey
1c. pea pods, halved crosswise
1/4 c. thinly sliced green onions. -2
1/4 c. chopped red sweet pepper -optional
3 TBLS salad oil
2 TBLS rice vinegar
2 TBLS soy sauce
1 tsp sugar
1/2 tsp toasted sesame oil -optional, but I think this makes the salad

Save seasoning packet from noodles for another use. Break up noodles; place in a cookie sheet with almonds and sesame seeds. Bake in a 350 oven for 5-8 min. or until golden, stirring once. Set aside.

In large salad bowl place cabbage, chicken, pea pods, green onion, and if desired, red sweet peppers; toss to combine.

For dressing, in a screw-top jar combine salad oil, vinegar, soy sauce, sugar, and if desired, sesame oil. Cover and shake well. Pour over cabbage mixture. Add toasted noodle mixture; toss to coat. Serve immediately.

Note: I like to use what ever veggies I think might go well with this salad that happen to be in my fridge. I also like to use the seasoning packet to season the chicken breast while I cook them.

ENJOY!


Tuesday, November 13, 2012

Thanksgiving Turkey Countdown

The other day I was playing with my Kiwi Lane Templates , I was trying to come up with fun ways to make turkeys. (you saw one on the card in the last post) Thank goodness I took pictures of the template ideas  and was able to pull them out when I decided to make this cute countdown.
 I took this one into my 1st grader's classroom for them to have fun counting down the last week before Turkey Day!
 Materials:
Kiwi Lane Rings, Nature and Tiny Nature Templates
One sheet of double sided paper, I used Basic Grey Pyrus
A number of different scraps in coordinating prints for the feathers
2 brads for eyes
Ink, dauber, scissors, paper distressor

 Here is how I laid out the templates so I knew what I was going to do. I put the larger Nature Leaf behind the and the smaller leaf layered in front.
 Now that you have a plan, layer your Rings out on your sheet of paper and trace them.
 The quick and easy secret to cutting rings is before cutting out individual rings, cut a slice through the paper from the outside to the center ring. Pretend that I have not cut the individual rings yet in this photo. Once the slice is cut you will be able to easily cut out each ring. I don't worry about cutting through the ring, it is easy to layer over it and hide the slice. Continue to trace the feathers using the Nature and Tiny Nature Leaves in various coordinating prints.
 At this point decide which side of the double sided paper you want to use for each of your turkey layers. I played with them and the different leaves until I liked what I saw.
 Now that you have laid it all out and know which side will be top, ink all the edges and distress  I snipped all of the feathers to give them a little more texture.
With all of that done it is time to glue it all together! I then cut a a beak from scraps and attached 2 brads. Add the countdown strips and start the fun! 

Thursday, November 8, 2012

Gratitude Banner and more...

My Oh My! 
This is my first REAL blog post! You know, as in PUBLIC!
Please be kind to me as you go through this tutorial, I AM AN AMATEUR, but hopefully I will get better with time. ;)

Every year, we start our GRATITUDE wall (door in our case) on the first Monday of November. Every day, we each post things that we are grateful for. It is fun to periodically stop and read, pondering all of the many blessings we have, and amazing to see all of those little slips of paper add up! Usually, we just use regular old printer paper; but this year I was struck with inspiration by the CUTE banners Jenn Nichols designs.(see one here) 

Of course, I HAD to use my Kiwi Lane Templates! (check them out here.) I just can't work without them anymore! I wanted to make this into a "burlap pennant" banner, but I couldn't find burlap locally. If you have some in your secret stash or access to it, GO FOR IT!
(in case you are new to blogging, you can click the picture for a larger view)


Materials List

  • Pattern Paper (larger scraps will work)
  • 2 full sheets of coordinating solid paper 
  • Kiwi Lane templates: Nature, Tiny Nature and Shapes  
  • Pencil, Scissors, Ink and Dauber, Adhesive
  • Letters (I used a Silhouette but Stickers would work)
  • Buttons, Brads, Twine, Glitter Glue etc...

DIRECTIONS: First you will need to choose a number of coordinating papers. I used the Basic Grey Pyrus line that I had lying around. I thought it set a nice tone for the season. I used scraps from the paper line as well as 2 sheets of solid paper.
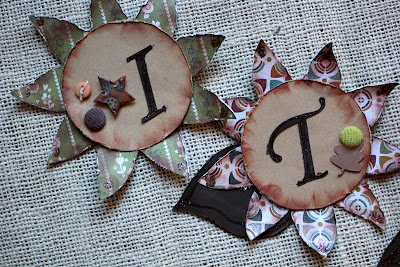
With your paper chosen, we are ready to start tracing the templates. I used the large flower from Nature in various prints, the large circle from Shapes with one solid sheet, and the leaf from Nature for the other solid. You will need 9 of each design. Using the scraps, I also cut 2 maple leaves from Tiny Nature to accent the beginning and end of the banner. 


Once all of the pieces are cut it’s time to ink! I love inking! I feel like it gives my projects a nice, finished look. I used Color Box Chalk in Burnt Sienna for this project.


I also chose to pull out one of my favorite forgotten tools; the little pink Heidi Swapp paper distresser! It gives a really nice texture. I especially love it on this project!


        Now that all of your pieces are cut, inked and distressed it is time to put your project together. You will want to choose your lettering and embellishments before going any further.  I pulled out my Silhouette (I hardly ever use it, but I signed up for an online class this week, so I thought it would be a great time to apply what I’m learning!) and used the leftover from the brown solid sheet to cut my letters (stickers would work well too). I also pulled out some fun Corduroy Buttons and Brads that I picked up a few years ago from Stamp N Up and finished it all off with some glitter glue! J (Studio G, from Micheal's I believe, in a copper brown, but I couldn't find a color name on it)


Once everything was dry I used scotch tape to attach it.


 -Enjoy and I would love to have you share what you make!


I had so much fun with this project I decided to use the paper with a few more projects.

For this layout I used Kiwi Lane's Spook Alley, the Swirl from Paradise, Tiny Brackets, the Flower from Accents and Flower from Tiny Accents.

And these two little turkeys were made with the Shell and Swirl from Paradise and the Circle from Shapes.  I cut the swirl down to fit my project just by adjusting and only tracing to the size I wanted it.


-HAVE FUN, with YOUR IMAGINATION and be sure to SHARE!