My Oh My!
This is my first REAL blog post! You know, as in
PUBLIC!
Please be kind to me as you go through this tutorial, I AM
AN AMATEUR, but hopefully I will get better with time. ;)
Every year, we start our GRATITUDE wall (door in our case) on the first Monday of
November. Every day, we each post things that we are grateful for. It is fun to
periodically stop and read, pondering all of the many blessings we have, and amazing to see all of those little slips of paper add up! Usually, we just use regular old printer paper; but this year I was struck with
inspiration by the CUTE banners Jenn Nichols designs.(see one here)
Of
course, I HAD to use my Kiwi Lane Templates! (check them out here.) I just can't work without them anymore! I
wanted to make this into a "burlap pennant" banner, but I couldn't
find burlap locally. If you have some in your secret stash or access to it, GO
FOR IT!
Materials List
- Pattern Paper (larger scraps will work)
- 2 full sheets of coordinating solid paper
- Kiwi Lane templates: Nature, Tiny Nature and Shapes
- Pencil, Scissors, Ink and Dauber, Adhesive
- Letters (I used a Silhouette but Stickers would work)
- Buttons, Brads, Twine, Glitter Glue etc...
DIRECTIONS:
First you will need to choose a number of coordinating papers. I used the
Basic Grey Pyrus line that I had lying around. I thought it set a nice tone for
the season. I used scraps from the paper line as well as 2 sheets of solid
paper.
With
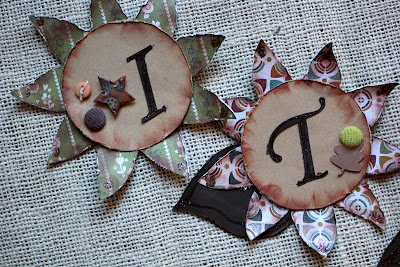
your paper chosen, we are ready to start tracing the templates. I used the
large flower from Nature in various prints, the large circle from Shapes with one solid sheet, and the leaf from Nature for the other solid. You will need 9
of each design. Using the scraps, I also cut 2 maple leaves from Tiny
Nature to accent the beginning and end of the banner.
Once
all of the pieces are cut it’s time to ink! I love inking! I feel like
it gives my projects a nice, finished look. I used Color Box Chalk in Burnt
Sienna for this project.
I
also chose to pull out one of my favorite forgotten tools; the little
pink Heidi Swapp paper distresser! It gives a really nice texture. I especially
love it on this project!
Now that all of your pieces are cut, inked and distressed it is
time to put your project together. You will want to choose your lettering
and embellishments before going any further. I pulled out
my Silhouette (I hardly ever use it, but I signed up for an
online class this week, so I thought it would be a great time to apply what I’m
learning!) and used the leftover from the brown solid sheet to cut my
letters (stickers would work well too). I also pulled out some fun Corduroy
Buttons and Brads that I picked up a few years ago from Stamp N Up and finished
it all off with some glitter glue! J (Studio G, from Micheal's I
believe, in a copper brown, but I couldn't find a color name on it)

Once everything was dry I used scotch tape to attach it.
-Enjoy and I would love to have you share what you make!
I had so much fun with this project I decided to use the paper with a few more projects.
And these two little turkeys were made with the Shell and Swirl from Paradise and the Circle from Shapes. I cut the swirl down to fit my project just by adjusting and only tracing to the size I wanted it.
-HAVE FUN, with YOUR IMAGINATION and be sure to SHARE!


No comments:
Post a Comment